Add Login (OIDC)
Add biometric single sign-on to your web app with the OIDC Authorization Code flow and PKCE — discovery, redirect, code exchange, and ES256 id_token validation.
This quickstart adds Sign in with SenseCrypt to a web application using the OIDC Authorization Code flow with PKCE. Users authenticate with an on-device face scan on their phone — no passwords, and no biometric data ever reaches your servers or ours.
SenseCrypt is a standard OpenID Connect provider, so if your stack already speaks OIDC this is a conventional integration: redirect to authorize, exchange the code, validate the ID token. The face ceremony happens between the redirect and the callback and is invisible to your code.
Using a framework? Jump to a copy-paste quickstart for Next.js, React SPA, Node/Express, or Python/FastAPI. This page is the protocol-level walkthrough they all build on.
Prerequisites
- A SenseCrypt tenant. Each tenant is its own OIDC issuer at
https://<your-tenant>.<domain>. - An OIDC application registered in the admin console, with your app's redirect URI allow-listed.
- Your
client_id(plus aclient_secretfor confidential apps; SPAs use PKCE only).
Register the application first: in the admin console, go to Applications → New OIDC application and set a name, your redirect URI(s), and the client type — Confidential for a server-side app (issues a client_secret) or SPA for a browser/native app (PKCE only, no secret).
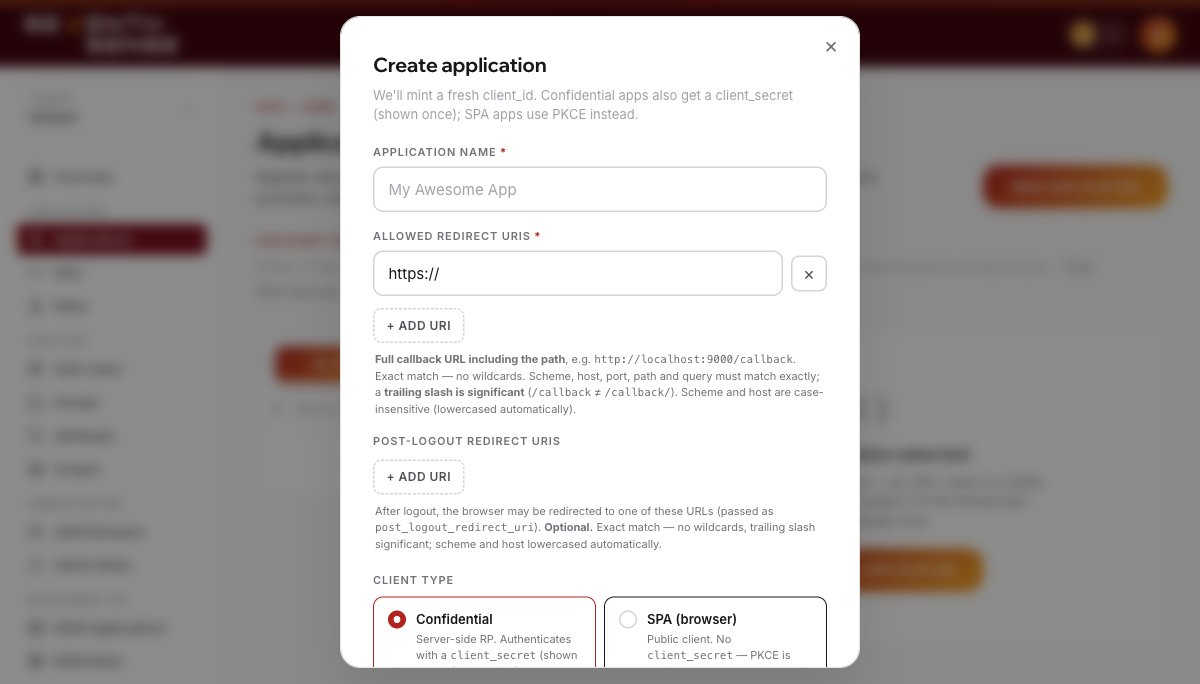
The Applications → New OIDC application form: name, redirect URIs, and client type.
Confidential vs SPA at a glance
| Confidential | SPA / public | |
|---|---|---|
Has a client_secret | Yes | No |
| Token endpoint auth | client_secret_post (or _basic, _jwt, private_key_jwt) | none — PKCE only |
| PKCE | Required (send S256) | Required (S256) |
Sends client_secret at /token | Yes | Never (a blank secret is rejected) |
| Refresh-token rotation | Configurable | Always on |
Discover the endpoints
Don't hard-code endpoints — resolve them from the tenant's discovery document:
curl https://<your-tenant>.<domain>/.well-known/openid-configurationA trimmed response looks like this (endpoints are the ones your app will call):
{
  "issuer": "https://<your-tenant>.<domain>",
  "authorization_endpoint": "https://<your-tenant>.<domain>/v1/idp/oidc/authorize",
  "token_endpoint": "https://<your-tenant>.<domain>/v1/idp/oidc/token",
  "userinfo_endpoint": "https://<your-tenant>.<domain>/v1/idp/oidc/userinfo",
  "jwks_uri": "https://<your-tenant>.<domain>/.well-known/jwks.json",
  "response_types_supported": ["code"],
  "grant_types_supported": ["authorization_code", "refresh_token", "urn:openid:params:grant-type:ciba"],
  "id_token_signing_alg_values_supported": ["ES256"],
  "code_challenge_methods_supported": ["S256"],
  "token_endpoint_auth_methods_supported": ["client_secret_post", "client_secret_basic", "client_secret_jwt", "private_key_jwt"],
  "scopes_supported": ["openid", "profile", "email", "offline_access"]
}
Use the advertised authorization_endpoint, token_endpoint, userinfo_endpoint, and jwks_uri. Note that response_types_supported is ["code"] (code flow only) and code_challenge_methods_supported is ["S256"] (PKCE is mandatory and S256-only).
Redirect the user to authorize
The sequence below traces the full ceremony from your app's side — your code writes only two of its seven steps, the redirect (Step 1) and the code exchange (Step 7), while Steps 2–6 run on SenseCrypt's hosted pages and the user's phone.
Generate a PKCE code_verifier and code_challenge (S256), a random state (CSRF protection), and optionally a nonce, then redirect the browser:
GET {authorization_endpoint}
  ?response_type=code
  &client_id={client_id}
  &redirect_uri={your_redirect_uri}
  &scope=openid profile email
  &state={state}
  &nonce={nonce}
  &code_challenge={code_challenge}
  &code_challenge_method=S256
Common parameters:
scope—openidis required. Addprofileandemailfor those claims, andoffline_accessto receive arefresh_token. You can only request scopes the application is allow-listed for.state— an opaque random value you check on the callback to prevent CSRF.nonce— optional; if you send one it is echoed in theid_tokenso you can bind the token to this request.login_hint— optional email to pre-fill SenseCrypt's email-entry page. SenseCrypt renders the same page whether or not the email is known, so a hint never leaks whether an account exists.
The user approves with a face scan on their phone; the browser returns to your redirect_uri with ?code=...&state=....
SenseCrypt requires PKCE with S256 (plain is rejected). The code is single-use and bound to your client_id + redirect_uri, which is validated against your allow-list by exact match (with trailing-slash tolerance).
If sign-in fails, SenseCrypt redirects back with an error instead of a code:
{your_redirect_uri}?error=access_denied&error_description=<reason>&state={state}error=access_denied means the ceremony was declined or the user isn't permitted for this app (see Troubleshooting). Always check for error before looking for code, and verify state matches what you sent.
Exchange the code for tokens
Send the code and code_verifier to the token endpoint. A confidential app also sends its client_secret; a SPA omits the secret and authenticates with PKCE alone.
curl -X POST {token_endpoint} \
  -d grant_type=authorization_code \
  -d code={code} \
  -d redirect_uri={your_redirect_uri} \
  -d client_id={client_id} \
  -d code_verifier={code_verifier}
  # confidential clients also add: -d client_secret={client_secret}
Successful response:
{
  "access_token": "eyJhbGciOiJFUzI1NiIsImtpZCI6…",
  "id_token": "eyJhbGciOiJFUzI1NiIsImtpZCI6…",
  "token_type": "Bearer",
  "expires_in": 3600,
  "scope": "openid profile email"
}
You get back an id_token (an ES256 JWT), an access_token, and — if you requested the offline_access scope — a refresh_token.
Token-endpoint errors use standard OAuth codes, for example:
{ "error": "invalid_grant", "error_description": "…" }invalid_grant is deliberately opaque — it covers an expired/used code, a failed PKCE check, and an authorization block (the group access gate re-runs at exchange time). See Troubleshooting.
Validate the ID token
Verify the id_token before you trust it. Fetch the tenant's JWKS from the jwks_uri, select the key by the token's kid, and verify the ES256 signature. Then check the claims:
issequals the tenant issuer (theissuerfrom discovery).audequals yourclient_id.expis in the future (andiatis sane).noncematches the one you sent (if you sent one).
Notable claims in the id_token:
{
  "iss": "https://<your-tenant>.<domain>",
  "sub": "8f2c…stable-per-tenant-id",
  "aud": "{client_id}",
  "exp": 1735689600,
  "iat": 1735686000,
  "auth_time": 1735686000,
  "nonce": "…",
  "email": "jane@acme.com",
  "name": "Jane Doe",
  "amr": ["face", "mfa", "pop"],
  "acr": "urn:sensecrypt:face-aal3"
}
The sub claim is a stable, per-tenant pseudonymous user id — safe to use as your primary key (it is not the internal database row id). amr/acr describe the original face ceremony (acr is a SenseCrypt-defined value, not a standards-registered one) and do not advance on refresh. Most OIDC libraries do steps 3 and 4 for you — see the framework quickstarts.
Call userinfo (optional)
Retrieve the scope-released claims for the signed-in user with the access token:
curl {userinfo_endpoint} -H "Authorization: Bearer {access_token}"{ "sub": "8f2c…", "name": "Jane Doe", "email": "jane@acme.com", "email_verified": true }Verify it worked
- Trigger sign-in and complete the email → QR → face proof on your phone.
- Confirm your callback received a
code(not anerror) and thatstatematched. - Confirm the token exchange returned an
id_token, and that its signature andiss/aud/expvalidate. - Sign in a second time — the
subshould be identical. A stablesubconfirms the token validated and the identity is consistent, which is what you key your user records on.
Troubleshooting
redirect_urimismatch / rejected at/authorize. Theredirect_urimust be on the application's allow-list and match byte-for-byte (scheme, host, port, path). Add every environment's callback URL.- PKCE errors /
invalid_grant. SenseCrypt isS256-only — never sendcode_challenge_method=plain. The samecode_verifierfrom step 2 must reach step 3. Don't send acode_verifierif you didn't send acode_challenge(SenseCrypt rejects a stray verifier). codealready used. The authorizationcodeis single-use. Some browsers speculatively prefetch the callback URL, firing the exchange twice; guard your callback so only the first request exchanges the code.invalid_client. Wrongclient_id/client_secret, or the wrong client type. Confidential clients must send the secret; SPA clients must send no secret (a blank one is rejected).- id_token signature or
audfailures. Verify against thejwks_urifrom discovery and check the token'skid(the JWKS may list a current key plus one in a rotation grace window). Make sure the issuer you validate against equals the token'siss. error=access_deniedon the callback. Either the user declined/failed the ceremony on their phone (error_descriptioncarries the reason, e.g. a face mismatch or timeout), or their email isn't permitted for this application by the group access gate. The latter is an authorization decision, not a bug.
Next steps
- Framework quickstarts — Next.js, React SPA, Node/Express, Python/FastAPI.
- Refresh & logout — Tokens & sessions covers
offline_access, refresh-token rotation, and RP-initiated logout. - Who can sign in — Authorization explains the group access gate.
- Other protocols — SAML SSO, SCIM provisioning, and the full API Reference.
Which flow should I use?
Pick the right SenseCrypt integration — Authorization Code with PKCE, CIBA, client-credentials (M2M), or SAML — based on whether a human signs in, whether a browser is present, and what protocol your app speaks.
Next.js (App Router)
Add Sign in with SenseCrypt to a Next.js App Router app using the OIDC Authorization Code flow with PKCE and an ES256 id_token verified against the tenant JWKS.